A01 - 图像基础操作
主要讲解使用 opencv 读图片到矩阵以及对矩阵的复制、裁剪、拼接的操作,注意 opencv 读入 RGB 图片时,其通道顺序变为 BGR。同时记住内部数据按 BGRBGR… 的方式存储的,和数据格式 (H, W, 3) 相符合
OpenCV 读取图像?
![]()
- 函数 cv2. imread () 用于从指定的文件读取图像,OpenCV 读取图像文件,返回值是一个 nparray 多维数组。OpenCV 对图像的任何操作,本质上就是对 Numpy 多维数组的运算
1
2
3
4
5
6
7
8
import cv2
img_path='xxx/图片1.jpg'
#Windows 下 Python 读取中文路径的图片存在问题
im = cv2.imdecode(np.fromfile(img_path, dtype=np.uint8), cv2.IMREAD_UNCHANGED)
#从网络读取图像
import urllib.request as request
response = request.urlopen("https://profile.csdnimg.cn/8/E/F/0_youcans")
imgUrl = cv2.imdecode(np.array(bytearray(response.read()), dtype=np.uint8), -1)
OpenCV 保存图像?
![]()
- 数 cv2. imwrite () 用于将图像保存到指定的文件,保存的文件格式是由 filename 的扩展名决定的,与读取的图像文件的格式无关
1
2
3
4
5
imgFile = "../images/logoCV.png" # 读取文件的路径
img3 = cv2.imread(imgFile, flags=1) # flags=1 读取彩色图像(BGR)
saveFile = "../images/imgSave.png" # 保存文件的路径
cv2.imwrite(saveFile, img3) # 保存图像文件
img_write = cv2.imencode(".jpg", img3)[1].tofile(saveFile)
OpenCV 显示图像?
![]()
- 函数 cv2. imshow () 在指定窗口中显示 OpenCV 图像,窗口自适应图像大小
1
2
3
4
5
6
imgFile = "../images/imgLena.tif" # 读取文件的路径
img1 = cv2.imread(imgFile, flags=1) # flags=1 读取彩色图像(BGR)
img2 = cv2.imread(imgFile, flags=0) # flags=0 读取为灰度图像
cv2.imshow("Demo1", img1) # 在窗口 "Demo1" 显示图像 img1
cv2.imshow("Demo2", img2) # 在窗口 "Demo2" 显示图像 img2
key = cv2.waitKey(0) # 等待按键命令, 1000ms 后自动关闭
OpenCV 图像属性?
![]()
- OpenCV 中图像对象的数据结构是 ndarray 多维数组,因此 ndarray 数组的属性和操作方法也都适用于 OpenCV 的图像对象
1
2
3
4
5
6
7
8
9
10
imgFile = "../images/imgLena.tif" # 读取文件的路径
img1 = cv2.imread(imgFile, flags=1) # flags=1 读取彩色图像(BGR)
img2 = cv2.imread(imgFile, flags=0) # flags=0 读取为灰度图像
# cv2.imshow("Demo1", img1) # 在窗口显示图像
# key = cv2.waitKey(0) # 等待按键命令
# 维数(ndim), 形状(shape), 元素总数(size), 元素类型(dtype)
print(img1.ndim, img2.ndim) # number of rows, columns and channels
print(img1.shape, img2.shape) # number of rows, columns and channels
print(img1.size, img2.size) # size = rows * columns * channels
print(img1.dtype, img2.dtype) # uint8
OpenCV 访问图像像素?
- 像素是构成数字图像的基本单位,像素处理是图像处理的基本操作,对像素的访问、修改,可以使用 Numpy 方法直接访问数组元素
1
2
3
4
5
6
7
8
9
10
11
12
13
14
15
16
17
18
19
# 1.13 Numpy 获取和修改像素值
img1 = cv2.imread("../images/imgLena.tif", flags=1) # flags=1 读取彩色图像(BGR)
x, y = 10, 10 # 指定像素位置 x, y
# (1) 直接访问数组元素,获取像素值(BGR)
pxBGR = img1[x,y] # 访问数组元素[x,y], 获取像素 [x,y] 的值
print("x={}, y={}\nimg[x,y] = {}".format(x,y,img1[x,y]))
# (2) 直接访问数组元素,获取像素通道的值
print("img[{},{},ch]:".format(x,y))
for i in range(3):
print(img1[x, y, i], end=' ') # i=0,1,2 对应 B,G,R 通道
# (3) img.item() 访问数组元素,获取像素通道的值
print("\nimg.item({},{},ch):".format(x,y))
for i in range(3):
print(img1.item(x, y, i), end=' ') # i=0,1,2 对应 B,G,R 通道
# (4) 修改像素值:img.itemset() 访问数组元素,修改像素通道的值
ch, newValue = 0, 255
print("\noriginal img[x,y] = {}".format(img1[x,y]))
img1.itemset((x, y, ch), newValue) # 将 [x,y,channel] 的值修改为 newValue
print("updated img[x,y] = {}".format(img1[x,y]))
OpenCV 创建图像?
![]()
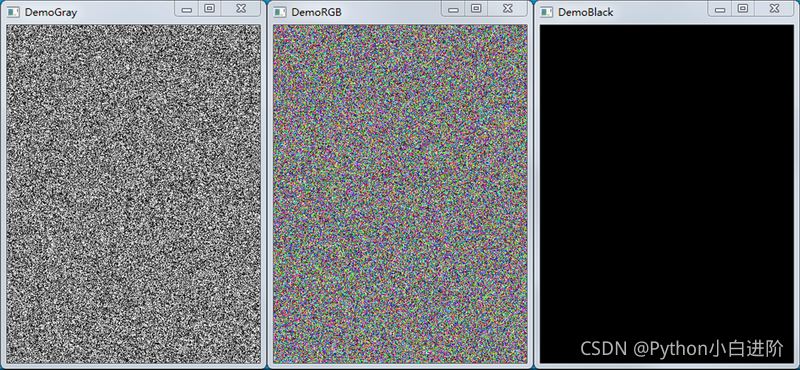
- OpenCV 中图像对象的数据结构是 ndarray 多维数组,因此可以用 Numpy 创建多维数组来生成图像。特别对于空白、黑色、白色、随机等特殊图像,用 Numpy 创建图像非常方便
1
2
3
4
5
6
7
8
9
10
11
12
13
14
15
16
17
18
19
20
21
height, width, channels = 400, 300, 3 # 行/高度, 列/宽度, 通道数
imgEmpty = np.empty((height, width, channels), np.uint8) # 创建空白数组
imgBlack = np.zeros((height, width, channels), np.uint8) # 创建黑色图像 RGB=0
imgWhite = np.ones((height, width, channels), np.uint8) * 255 # 创建白色图像 RGB=255
# (2) 创建相同形状的多维数组
img1 = cv2.imread("../images/imgLena.tif", flags=1) # flags=1 读取彩色图像(BGR)
imgBlackLike = np.zeros_like(img1) # 创建与 img1 相同形状的黑色图像
imgWhiteLike = np.ones_like(img1) * 255 # 创建与 img1 相同形状的白色图像
# (3) 创建彩色随机图像 RGB=random
import os
randomByteArray = bytearray(os.urandom(height * width * channels))
flatNumpyArray = np.array(randomByteArray)
imgRGBRand = flatNumpyArray.reshape(height, width, channels)
# (4) 创建灰度图像
imgGrayWhite = np.ones((height, width), np.uint8) * 255 # 创建白色图像 Gray=255
imgGrayBlack = np.zeros((height, width), np.uint8) # 创建黑色图像 Gray=0
imgGrayEye = np.eye(width) # 创建对角线元素为1 的单位矩阵
randomByteArray = bytearray(os.urandom(height*width))
flatNumpyArray = np.array(randomByteArray)
imgGrayRand = flatNumpyArray.reshape(height, width) # 创建灰度随机图像 Gray=random
show_images([imgGrayRand,imgRGBRand,imgBlack])
OpenCV 复制图像?
- 使用 Numpy 的 np.copy () 函数可以进行图像的复制,不能通过直接赋值进行图像的复制
1
2
img1 = cv2.imread("../images/imgLena.tif", flags=1) # flags=1 读取彩色图像(BGR)
img2 = img1.copy()
OpenCV 裁剪图像?
![]()
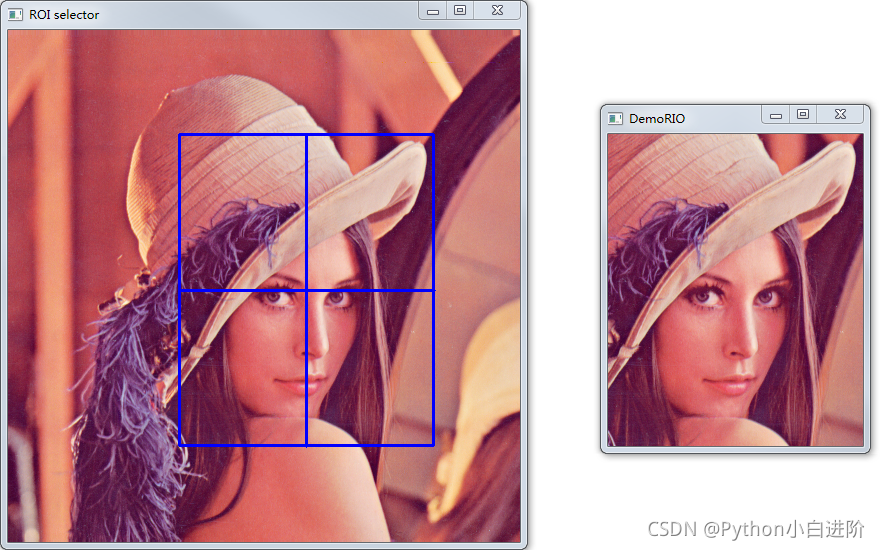
- 用 Numpy 的切片方法可以进行图像的裁剪,操作简单方便
1
2
3
img1 = cv2.imread("../images/imgLena.tif", flags=1) # flags=1 读取彩色图像(BGR)
xmin, ymin, w, h = 180, 190, 200, 200 # 矩形裁剪区域 (ymin:ymin+h, xmin:xmin+w) 的位置参数
imgCrop = img1[ymin:ymin+h, xmin:xmin+w].copy() # 切片获得裁剪后保留的图像区域
OpenCV 拼接图像?
![]()
- 用 Numpy 的数组堆叠方法可以进行图像的拼接,操作简单方便
1
2
3
4
5
6
7
img1 = cv2.imread("../images/imgLena.tif") # 读取彩色图像(BGR)
img2 = cv2.imread("../images/logoCV.png") # 读取彩色图像(BGR)
img1 = cv2.resize(img1, (400, 400))
img2 = cv2.resize(img2, (300, 400))
img3 = cv2.resize(img2, (400, 300))
imgStackH = np.hstack((img1, img2)) # 高度相同图像可以横向水平拼接
imgStackV = np.vstack((img1, img3)) # 宽度相同图像可以纵向垂直拼接
OpenCV 图像通道拆分?
![]()
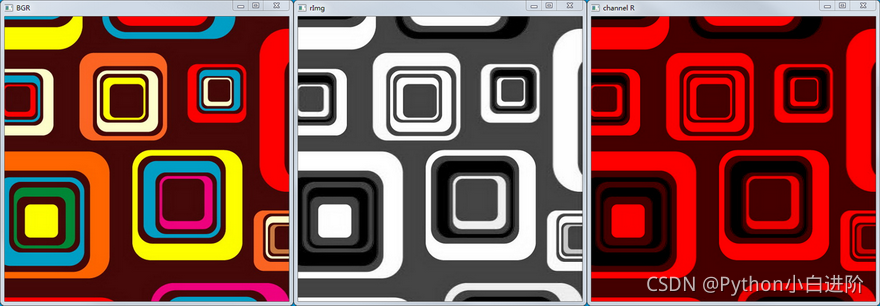
- 函数 cv2.split () 将 3 通道 BGR 彩色图像分离为 B、G、R 单通道图像
1
2
3
4
5
6
7
img1 = cv2.imread("../images/imgB1.jpg", flags=1) # flags=1 读取彩色图像(BGR)
# BGR 通道拆分
bImg, gImg, rImg = cv2.split(img1) # 拆分为 BGR 独立通道
# 将单通道扩展为三通道
imgZeros = np.zeros_like(img1) # 创建与 img1 相同形状的黑色图像
imgZeros[:,:,2] = rImg # 在黑色图像模板添加红色分量 rImg
show_images([img1,rImg,imgZeros])
OpenCV 合并图像?
![]()
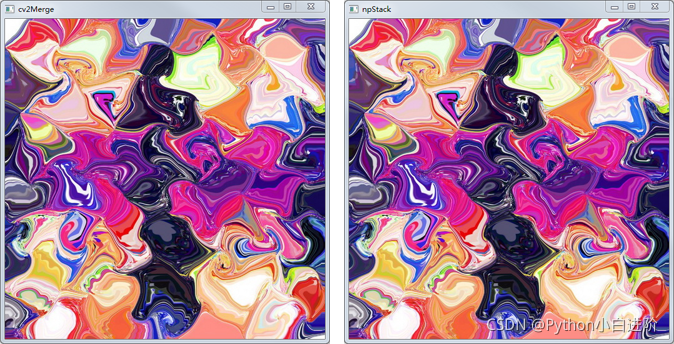
- 函数 cv2.merge () 将 B、G、R 单通道合并为 3 通道 BGR 彩色图像
1
2
3
4
5
6
7
img1 = cv2.imread("../images/imgB1.jpg", flags=1) # flags=1 读取彩色图像(BGR)
bImg, gImg, rImg = cv2.split(img1) # 拆分为 BGR 独立通道
# cv2.merge 实现图像通道的合并
imgMerge = cv2.merge([bImg, gImg, rImg])
# Numpy 拼接实现图像通道的合并
imgStack = np.stack((bImg, gImg, rImg), axis=2)
show_images([imgMerge,imgStack])
参考:
- 【OpenCV 例程 300 篇】01. 图像的读取(cv2.imread)_cv2 读取图像_youcans_的博客 - CSDN 博客
- 【OpenCV 例程 300 篇】02. 图像的保存(cv2.imwrite)_youcans_的博客 - CSDN 博客
- 【OpenCV 例程 300 篇】03. 图像的显示(cv2.imshow)_youcans_的博客 - CSDN 博客
- 【OpenCV 例程 300 篇】04. 用 matplotlib 显示图像(plt.imshow)_plt.imshow () 函数_youcans_的博客 - CSDN 博客
- 【OpenCV 例程 300 篇】05. 图像的属性(np.shape)_图像的 shape_youcans_的博客 - CSDN 博客
- 【OpenCV 例程 300 篇】06. 像素的编辑(img.itemset)_youcans_的博客 - CSDN 博客
- 【OpenCV 例程 300 篇】07. 图像的创建(np.zeros)_opencv zeros_youcans_的博客 - CSDN 博客
- 【OpenCV 例程 300 篇】08. 图像的复制(np.copy)_opencv copy_youcans_的博客 - CSDN 博客
- 【OpenCV 例程 300 篇】09. 图像的裁剪(cv2.selectROI)_youcans_的博客 - CSDN 博客
- 【OpenCV 例程 300 篇】10. 图像的拼接(np.hstack)_youcans_的博客 - CSDN 博客
- 【OpenCV 例程 300 篇】11. 图像通道的拆分(cv2.split)_youcans_的博客 - CSDN 博客
- 【OpenCV 例程 300 篇】12. 图像通道的合并(cv2.merge)_cv2.merge 函数_youcans_的博客 - CSDN 博客
- 【OpenCV 例程 300 篇】255.OpenCV 实现图像拼接_youcans_的博客 - CSDN 博客


